How to Build a Blue Bird House
If you have kids, and if they belong to Cub Scouts, Brownies, Indian Guides, Indian Maidens, etc., then you know how hard it can be to come up with good, interesting, meaningful projects that the kids can finish in a single meeting. This article describes how to create a bluebird house kit that is easy to produce and costs very little. You can use the kits as a youth project, or you can assemble them yourself and put them around your property if you are interested in attracting bluebirds (see the links below for help on creating a "bluebird trail"). If you have a lot of grandkids, you could make a set of the kits and give them to the kids as Christmas presents. If you are a teenager you can assemble the kits to and sell them as a money-making or community project.
I designed and created a set of the kits for a friend who was faced with leading an Indian Guides meeting. The whole project went over very well, and the boys and their fathers enjoyed it immensely. The boys were easily able to assemble and paint their houses in one meeting. Although this project requires a fair amount of your time prior to the meeting to get the kits set up, you will be repaid many times over by the pride and excitement the kids will feel when they finish building the bluebird houses themselves. The assembly process is nearly foolproof and therefore has an extremely high probability of success for everyone in the group. This article has two parts. Part 1 shows you how to create the kits. You will do this part before the meeting, preferably with another parent who: 1) you enjoy being with, and 2) is not afraid of tools. Part 2 is the assembly instructions for the kids.
Overview of the Project Before getting to the instructions, here is a quick overview of the project. The goal is to assemble a kit that allows a typical 8- to 12-year old to successfully build and paint a birdhouse in a single meeting, and have fun doing it. The kit goes together like this:
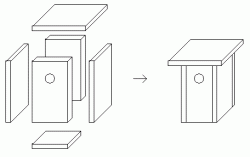
The back is nailed to the two sides. The roof is nailed on top of the back and the two sides. The sides are nailed to the floor. The door is nailed to the two sides so it pivots from the top, and is held in place at the bottom by a latch nail.
What you need to do before the meeting is buy the wood, cut it to the proper sizes, and drill the entry and nail holes. You will create for each kid a kit that includes the six wooden pieces that make up the house, a set of nails, a wire loop for hanging, and a paintbrush. You should request that the kids each bring a hammer with them to the meeting, but have a few extra hammers on hand for those who inevitably forget.
It is not a bad idea to cut the pieces for one birdhouse and assemble it prior to creating an assembly line to create 10 or 20 kits. That way you can work out any kinks before you cut all of your wood.
